How to work in Microsoft word.
MS WORD 2010 BASIC

Step 2 − Click the All Programs option from the menu.

Ribbon contains commands organized into three components −


Step 3 − Finally click anywhere where you want to copy the selected text & use these two simple options. −


Microsoft Office Word allows you to create and edit personal and business documents.Microsoft Word can be used for the following purposes −
- To design different documents.
Audience
This tutorial will give you an understanding of MS Word.
Prerequisites
We assume that you have the basic understanding of Computer like a mouse, keyboard, monitor, screen, etc. and their basic operations.
Getting Start MS Word 2010
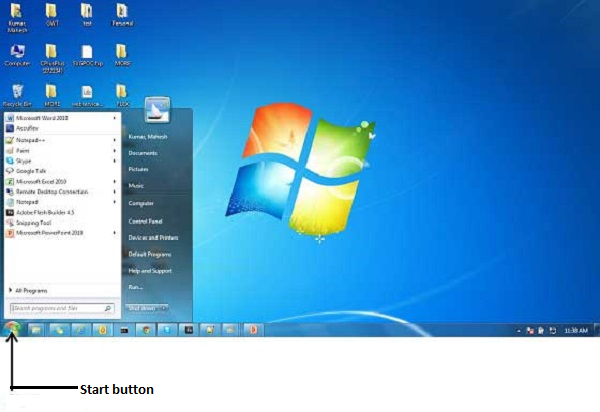
How to start a Word application in simple steps. Assuming you have Microsoft Office installed on your PC, to start the Word application, follow these steps −
Step 1 − Click the Start button.
Step 2 − Click the All Programs option from the menu.
Step 4 − Search for Microsoft Word from the submenu and click it.
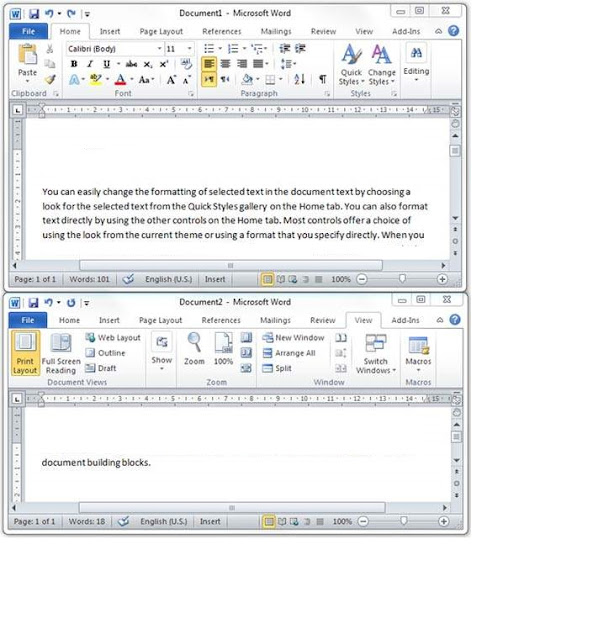
This will launch the Microsoft Word application and you will see the following window.
picture
Explore Window in MS Word
File Tab
File tab replaces Office button from Word 2007 used to check the Backstage view.
Quick Access Toolbar
This is just above the File tab convenient resting place for the most frequently used commands in Word.
Ribbon
Ribbon contains commands organized into three components −
- Tabs −
- The layout is the example of ribbon tabs."
- Groups −
- Commands
Title bar
Rulers
Word has two rulers. The horizontal ruler appears just beneath the Ribbon. The vertical ruler appears on the left edge of the Word window.
Help
This Help Icon can be used to get word related help anytime.
Zoom Control
This is used for zoom in zoom control consists of a slider that you can slide left or right to zoom in or out.
View Buttons
These five buttons as given below by using you can switch the Word's various document views.
- Print Layout view
- Full-Screen Reading view
- Web Layout view
- Outline view
- Draft view
Document Area
Flashing vertical bar it represents a location where the text appears when you type.
Status Bar
Display any documents information and shows the total number of pages and words in the given document language etc.
Dialog Box Launcher
Appears small arrow in the lower-right corner on Ribbon. By Clicking button a dialog box is open that provides more options.
Backstage View in MS Word
Here we will discuss the Backstage View in Word.The backstage view helps for creating new documents, saving and opening documents etc.We can use backstage view: By clicking the File tab, of the Word Ribbon.

If a document is already open, then it will display detail about the opened. A backstage view has three columns the 1st column.
First column
| S.No | Option & Description |
|---|---|
| 1 |
If the document opened, it may be saved as otherwise, it would display the box asks you for the document or file name.
|
| 2 |
Save As
A dialogue box will be asking for document name & type, or save as .docx file.
|
| 3 |
Open
Open is used to open an already saved word file.
|
| 4 |
Close
This option is used to close an open document.
|
| 5 |
Info
Info used to display information of the opened file.
|
| 6 |
Recent
Recent is used to record all the recently opened files.
|
| 7 |
New
New is used to open a new file or a document.
|
| 8 |
Print
A print option is used to print a document which is open.
|
| 9 |
Save & Send will save an open file or document and display option to send the document or file using email, Facebook, WhatsApp etc.
|
| 10 |
Help
It is used to get help about Word of any version you may use.
|
| 11 |
Options
An option is used to view various options related to MS Word.
|
| 12 |
Exit
By using exit button we can close our document or file that we have open.
|
Document Properties
By clicking Info option it displays many properties of the backstage view. These properties may have document size & the number of pages in given document, the total number of words in a document or the name of author etc.
Exit Backstage View
If you want to exit click on the File tab or press the Esc button to go back to working mode.
Entering Text - Microsoft Word
Here we discuss how to enter or write text in MS WORD you know that when we start MS Word, it displays a new file or a document.
Document area is where we enter our text.When you type. keep the cursor or mouse at text insertion point and start typing or writing text.
You do not need to press Enter button for starting a new line.When the insertion point reaches the end of the line, MS Word will automatically start a new one.Tab key is to add more than one spaces instead of using the spacebar.
Save Document in MS Word
Saving New Document
When you are done your typing in your Word document.Following are the steps to save an edited Word document.
Step 1 − Click on File tab & select the Save As option.

Step 2 − For saving a document select a folder where you want to save, Enter the file name & Select the save as option, and the file is saved as a .docx format.

Step 3 − Click on Save button and a document will be saved.
Opening a Document in MS Word
Opening New Document
A new blank document opens when we start MS Word. Here are the few steps to open a new document −
Step 1 − Click the File tab & select the New option.

Step 2 −You select the New option, it will display a list of templates.Click on the Blank document; the first option in the template. We discuss other templates given in the list.
You have your blank document as shown. The document is ready to start typing.

The shortcut of using blank document is: press Ctrl + N keys and you will see a new blank document.
Opening Existing Document
A situation is when we open an existing document and edit it. Follow the steps to open an existing document −
Step 1 − Click the File tab and select the Open option.

Step 2 − This will display an Open dialog box.Let's search through different folders and files, and also lets you select a file you want to open.

Step 3 − Finally select a file you want to open and click the small triangle Open button.
Closing a Document in MS Word
Here are some steps to close an opened document −
Step 1 − Click the File tab and select the Close option.

Step 2 − When we select the Close option & if the document is not saved before closing, it will give following Warning or ask that the document should be saved or not.

Step 3 − click Save or Don't Save to go back to a document click Cancel.This will close the document.

Editing Documents
Insert and Add Text
First, we will see ...
Step 1 − Click the location where you want to enter text.
Step 1 − Click the location where you want to enter text.

Step 2 − Start typing the text that needs to be inserted. Word inserts the text to the left of the insertion point, moving the existing text to the right

Insert and Replace Text
In Insert mode, the text shall be added in existing content but it shall over write all the content.
Step 1 − Right-click on the status bar and select Overtype option from display menu.
When we select the Overtype, the status bar shall show the insert mode.

Step 2 − Click on the Insert text and it will change to the Overtype mode as shown below.

Step 3 − Click on the location where you want to insert the text or you can use the keyboard to locate the place where you want to insert the text.

Step 4 − Start typing the text that you want. Word will replace the existing text with the newly typed text which you enter by your keyboard without moving position of the already existing test.

Note − MS Word disabled Insert key so you have to follow the above-mentioned method for insert mode.
Select Text in MS Word
The common method of selecting a text by using mouse over the text you want to select. The table given below has a few simple methods that will help you in selecting text.
| S.No | Component & Selection Method |
|---|---|
| 1 |
Click at the start of the alphabet of text, hold down Shift, and click at the end of the alphabet or line.
|
| 2 |
Selecting a single word
Click anywhere which you want to select.
|
| 3 |
Selecting a paragraph
Triple-click at any place in a paragraph which you want select.
|
| 4 |
Selecting a sentence
Hold the Ctrl key on the keyboard and click on any place in a sentence you want select.
|
| 5 |
Selecting a column of text
Hold Alt key, click and hold the button of a mouse, and drag over the column u want select.
|
Using the Selection Bar
The black area in the given screen shot is called the selection bar.

You can use selection bar for selecting the various components of a document as given below.
| S.No | Component & Selection Method |
|---|---|
| 1 |
Selecting a line
Take cursor of a mouse in selection bar and click in front of a line you want to select in MS word.
|
| 2 |
Take your mouse in selection bar and click in front of a paragraph which you want to select in MS word.
|
| 3 |
Selecting the document
Take your mouse in the selection bar and triple-click in MS word.
|
Using the Keyboard
for selecting as shown in given table
| S.No | Key & Selection Method Selecting Text |
|---|---|
| 1 |
Ctrl + A
Press Ctrl + A keys to select the all entire document.
|
| 2 |
Shift
Keep pressing a Shift key and use any of the keyboard arrow keys to select the text.
|
| 3 |
F8
Using F8 key use any of the arrows keys to select the text.
|
| 4 |
Ctrl + Shift + F8
Press Ctrl + Shift + F8 and use any arrow key to select a column of a text.
|
Delete Text in MS Word
Using Backspace & Delete Keys
The deletion technique is to delete characters atones by pressing either the backspace key or the delete key. Given table describes how can you delete a single word or a whole word.
| S.No | Keys & Deletion Methods |
|---|---|
| 1 |
Backspace
Keep insertion point after the word or line which you want to delete and press the Backspace button of your keyboard.MS Word deletes the character.
|
| 2 |
Ctrl + Backspace
Keep insertion point after a word or characters which you want to delete & press Ctrl + Backspace buttons. Word deletes the whole word suddenly.
|
| 3 |
Delete
Keep insertion point before the word or characters which you want to delete and press the Delete button. Word deletes the word of or character suddenly.
|
| 4 |
Ctrl + Delete
Keep insertion point before the word or characters which you want to delete and press Ctrl + Delete buttons.
|
Using Selection Method
To select many parts of the Word document as described in the following table −
| S.No | Component Selection & Delete Methods |
|---|---|
| 1 |
Deleting text between two points
Click start of the text, hold keyboard Shift key, and click at the end of a block for selecting the portion of text and press either the Backspace key of the keyboard or the Delete key on the keyboard.
|
| 2 |
Deleting a single word
Click at any place on a word you want to delete & press either the Backspace key or the Delete key.
|
| 3 |
Deleting a paragraph
Triple-click at any place in a paragraph which you want to delete & press the Backspace key or the Delete key on your keyboard.
|
| 4 |
Deleting a sentence
Hold Ctrl button & click on any place in a sentence which you want to delete & press the Backspace or the Delete key on your keyboard.
|
| 5 |
Deleting a column of text
Hold the Alt key & hold the mouse button, and drag over the column which you want to delete & press the Backspace key or the Delete key on your keyboard.
|
| 6 |
Deleting a line
Take mouse in the selection bar area & click in front a line or word which you want to delete & press the Backspace key or the Delete key on your keyboard.
|
| 7 |
Deleting entire document content
Ctrl + A keys to delete the entire word or documents & press the Backspace key or the Delete key on your keyboard.
|
Move Text in MS Word
Move within the same document
Step 1 − Select a portion of text by using any of text selection methods as given below.


Step 2 − Now take a mouse cursor over the selected text & hold the left button of your mouse & keep holding & moving around the document.
Step 3 − Now take a mouse cursor to the place to move the selected text and release the button of a mouse. We will see that the selected text is moved to the final location where you want.

Move within different documents
You can also move your selected text from one document to another document in MS word.Following simple steps are given below.

Step 2 − Select a portion of text by using any text selection methods.
Step 3 − Take a mouse cursor over the selected text & hold the left mouse button & keep holding and moving around the document for moving.
Step 4 − Take a cursor of a mouse to the place in the 2nd document where you want to move the selected text & release the button of a mouse.After that, you will see the selected text is moved to the Final location in the 2nd document for moving.

Copy & Paste in MS Word
Copy & Paste Operation
Following is the procedure to copy the material in MS word −
Step 1 − Select the portion of text by using any of the text selection methods as given below.

Step 2 − You have the variety of options to copy the selected text. You can use of any of the options given below.
- Using Right-Click
- Using Ctrl + c Keys


Step 3 − Finally click anywhere where you want to copy the selected text & use these two simple options. −
- Using Ribbon Paste Button
- Using Ctrl + v Keys

Cut & Paste Operation
Step 1 − Select a portion of the text which you want.

Step 2 −You have many options to cut the selected text.You can make use of one of the options given below.
- Using Right-Click
- Using Ribbon Cut Button
- Using Ctrl + x Keys

Step 3 − Finally click at a place where we want to move the selected text & use of two simple options −
- Using Ribbon Paste Button
- Using Ctrl + v Keys

Find & Replace in MS Word
Find Command
Step 1 − We can work out on a sample text available in Word document given below. Just type =rand() & press Enter key; the screen given below will appear −

Step 2 − Click on the Find option on the Home tab or press Ctrl + F from the keyboard to launch the Navigation pane.
 Step 3 − Enter a word or line which you want to search type in the Search box, Word searches for the text you entered & displays the results in the navigation pane & highlights a word in the document as given below.

Step 4 − You can click the (X) button to clear the search & results & perform another search.
Step 5 − You can use other options while searching for a word & Click the Options button to display the options menu & then click the Options. option; IT WILL display the list of options.

Step 6 − Finally you have done with the Search operation, you can click the (X) button to close the Navigation Pane in MS word.

Step 2 − Click on the Find option on the Home tab or press Ctrl + F from the keyboard to launch the Navigation pane.


Step 4 − You can click the (X) button to clear the search & results & perform another search.

Step 6 − Finally you have done with the Search operation, you can click the (X) button to close the Navigation Pane in MS word.
Find & Replace Operation
Step 1 − Press Ctrl + H for launching the Find and Replace box as shown in Step 2

Step 2 − Type a word or line which you want to search. You may also replace the word by using the Find and Replace dialog box as given below screenshot

Step 3 − Click on the Replace button on the Find and Replace dialog box & you will see the first searched word would be replaced with the replace with a word. Clicking again on Replace button would replace next searched word. If we will click Replace All button then it will replace all the found words given. You may also use Find Next button to search the next occurrence and later after you can use Replace button of your keyboard to replace the word found.
Step 4 − You can use More >> button of your keyboard to use more options and to make your search more specific like case sensitive search or searching for whole word only etc.
Step 5 − Finally Find & Replace operation, you can click the Close (X) OR Cancel button on the screen of the dialog box to close the box given.
Spell Check in MS Word
Check Spelling and Grammar using Review tab
This procedure can be used to find out the mistakes of spelling in MS word.
Step 1 − Click on the Review tab & then click the Spelling and Grammar button given there.

Step 2 − Dialog box will appear & will display the wrong spellings & You shall also get suggestions about to correct those spellings as given below −

HERE you have some options to fix the spelling mistakes −
-
Ignore .
-
Ignore All.
-
Add to Dictionary
-
Change −
-
Change All
-
Following are the different options in case you have grammatical mistake −
-
Next Sentence
-
-
Options
-
Undo
Step 3 − Select the given suggestions which you want to use & click the Change option to fix the spelling or grammar mistake & repeat the step to fix all the spelling or grammar mistake in MS Word.
Step 4 − MS Word displays a box when it finishes checking of mistakes then Click OK.
HERE you have some options to fix the spelling mistakes −
- Ignore .
- Ignore All.
- Add to Dictionary
- Change −
- Change All
Following are the different options in case you have grammatical mistake −
- Next Sentence
- Options
- Undo
Step 3 − Select the given suggestions which you want to use & click the Change option to fix the spelling or grammar mistake & repeat the step to fix all the spelling or grammar mistake in MS Word.
Step 4 − MS Word displays a box when it finishes checking of mistakes then Click OK.

Check Spelling and Grammar using Right Click
If you click right on your mouse button over a misspelled word in MS Word, then it will show you the correct suggestions & the above-mentioned options to fix the spelling or grammar mistake as given below.

If you click right on your mouse button over a misspelled word in MS Word, then it will show you the correct suggestions & the above-mentioned options to fix the spelling or grammar mistake as given below.

Zoom In-Out in Word 2010
Here is the simple method to apply for zoom-in OR zoom-out work by using the View tab.
Step 1 − Click on the View tab in MS Word & then click the Zoom button as given below.

Step 2 − When you click on the Zoom button in MS Word, a dialog box will appear.This will use to reduce or increase the size of the document given on-screen.

Step 3 − When you have done with selecting an option, click on OK button to apply the changes on the document given on screen.
Step 4 − Try different options available there, for Instance, Page Width, and Text Width.
Zoom-in and Zoom-out using (+)and(-)Buttons
The given screenshots will teach you Zoom-out which is the (-)button and Zoom-in which is the (+) button.

The given screenshots will teach you Zoom-out which is the (-)button and Zoom-in which is the (+) button.

Step 1 − Click on the Zoom-out button given on screen, You will see that your document size will decrease by 10% every time you click on the button. Same way, if you click on Zoom-in button the document size will increase by 10% every time you click on the button.
Step 2 - The above-given screenshot shows 140% zoom-in view of the given document.
Special Symbols in Word 2010
In order to insert symbols in MS Word, we follow the step as given below.
In order to insert symbols in MS Word, we follow the step as given below.
Insert Special Symbols
Here is the simple method to apply Symbol button by using the Insert tab.
Step 1 − To go on insert tab, bring your cursor at the (a) Equation & (b) Symbols. Click one of these two options based on your requirement. You will further use equations while preparing mathematical or scientific or any similar document. For now, we are going to understand the use of the Symbol button as shown below.

Step 2 − When you go to insert tab, a small list of symbols box will appear as shown below.

Step 3 − You can click on any of the available symbols in the box insert into your document at the selected location. If you do not find the desired symbol in this small box, then you can click on the More Symbols option to have a wide range of symbols as shown below in the Symbol dialog box. You can select the symbol by clicking on Insert button to insert the symbol which you want to select.

Assign Shortcut Key
You can select a keyboard shortcut to type any of the available symbols. Ctrl + Q key to insert the © symbol which is one of the available symbols in the special symbols list −
Step 1 − Assume that You already have the following symbol dialog box opened.

Step 2 −You select the symbol for which a shortcut key needs to be assigned. then click the Shortcut Key button which will display the following Customize Keyboard dialog box.

You can select a keyboard shortcut to type any of the available symbols. Ctrl + Q key to insert the © symbol which is one of the available symbols in the special symbols list −
Step 1 − Assume that You already have the following symbol dialog box opened.
Step 1 − Assume that You already have the following symbol dialog box opened.

Step 2 −You select the symbol for which a shortcut key needs to be assigned. then click the Shortcut Key button which will display the following Customize Keyboard dialog box.

Step 3 − Enter Ctrl + Q in the shortcut key box and then click the Assign button to assign the shortcut key the selected key will be added to the list of assigned keys. Click the close button to close the dialog box.
Step 4 −By using the keyboard when you enter ctrl +Q key you will find that you are able to type © symbol without going into the Symbol dialog box.
Undo Changes in Word 2010
Here are the simple and important features in MS Word which provides two important features undo and redo or repeat.The Undo feature is used to undo the previous action and the Repeat or Redo feature is used to repeat the previous action.
For example, you can use the undo feature, if you mistakenly delete text.The undo feature to recover it. In a similar way, you can use the repeat operation if you delete a character and want to delete more characters.
Here are the simple and important features in MS Word which provides two important features undo and redo or repeat.The Undo feature is used to undo the previous action and the Repeat or Redo feature is used to repeat the previous action.
How to use Undo & Repeat operations
Here is a simple procedure to apply undo and repeat or redo operation.You can access the Undo and Repeat buttons from the Quick Access toolbar.

Step 1 − You type some text in a blank document. Now click the redo button and you will see that text will repeat the same operation for you.

Step 2 − Here we check the undo operation, We remove the last word character by character so that you have the following text remaining in the line.

Step 3 − Now we try to click the Undo button one by one. After performing few undo operation You will see that Word will recover all the deleted characters one by one.

Shortcuts to use Undo & Repeat operations
You can be used the keyboard shortcuts for access the undo and redo operation
from Quick access toolbar. But because these commands are the most frequently used commands, we recommend you memorize their keyboard shortcuts which are as follows −
2
Ctrl + Y
Repeats the previous action.
1
Ctrl + Z
Undoes the previous action.
Here is a simple procedure to apply undo and repeat or redo operation.You can access the Undo and Repeat buttons from the Quick Access toolbar.

Step 1 − You type some text in a blank document. Now click the redo button and you will see that text will repeat the same operation for you.

Step 2 − Here we check the undo operation, We remove the last word character by character so that you have the following text remaining in the line.
Step 3 − Now we try to click the Undo button one by one. After performing few undo operation You will see that Word will recover all the deleted characters one by one.
Shortcuts to use Undo & Repeat operations
You can be used the keyboard shortcuts for access the undo and redo operation
from Quick access toolbar. But because these commands are the most frequently used commands, we recommend you memorize their keyboard shortcuts which are as follows −

Step 3 − Now we try to click the Undo button one by one. After performing few undo operation You will see that Word will recover all the deleted characters one by one.

Shortcuts to use Undo & Repeat operations
You can be used the keyboard shortcuts for access the undo and redo operation
from Quick access toolbar. But because these commands are the most frequently used commands, we recommend you memorize their keyboard shortcuts which are as follows −
| 2 |
Ctrl + Y
Repeats the previous action.
|
| 1 |
Ctrl + Z
Undoes the previous action.
|

AWesome
ReplyDeleteThanks uncle
DeleteHow ToHow to use Quick Parts feature in MS Word – Microsoft has included several types of feature in Word which makes it unique among all. Among all these features, Quick Parts is a brilliant tool with AutoText, Insert preformatted text, document properties, etc. It allows us to create a piece of content and paste them directly into the email messages of Microsoft Outlook. Quick Part is specially designed for email signatures and MS Office template.
ReplyDelete